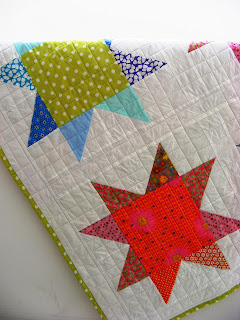
Dec 17, 2010

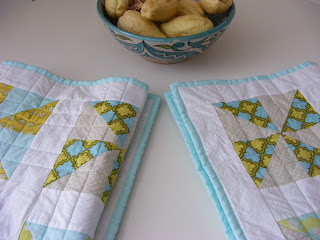
Decorative pillows


The second edition of the Craft Fair I attended two weeks ago starts tomorrow, at the same location. I will showing quilts (of course!) but also smaller and much more affordable pieces of patchwork. It was the first time I actually ventured making small pieces and I really enjoyed the process. It is like having a tiny canvas to work on, I do recommend you try it and I'm looking forward to sew small again soon. In fact, I have already started to dream about miniature pieces but this project will have to wait until the days are longer: winter and I don't combine, I even have the sensation that I can't see the colors properly after 3 pm.
These decorative pillows are my first clumsy attemp, please be kind!

Nov 26, 2010

Making a quilt #4: cutting fabric


Cutting is an essential part of quilting and I personally enjoy it very much, particularly after I got myself an Olfa rotary cutter and a cutting mat. Believe or not, I only did so recently. I used to cut everything with scissors but I wouldn't go back now. Even though quilting has been around long before rotary cutters and mats were invented and one can do perfectly alright without them, once you’ve got the hang of it they become absolutely indispensable because it’s so much quicker and accurate!
Cutting should be done parallel to the grain of the fabric. Doing so, you will avoid unnecessary distortion that can make sewing difficult. So fold your fabric lengthwise with selvages together and adjust until it is straight. Use the fold as a guide to align the fabric with the grid of your cutting mat, set your ruler in place and cut the stripe. The turn around the stripe and cut the squares. I find it easier to cut in the vertical direction than in the horizontal. Never use the selvages; they have a different thickness and behavior and will distort your pieces!
Also, don’t apply more pressure than necessary with the rotary cutter or your hands will be sore and your cutting mat will have a shorter lifespan.
In case you’re wondering, I use a common ruler rather than a quilter’s ruler because it has suited me perfectly well until now. I just follow the grid of my cutting mat. But remember I was the one who cut fabric with scissors until recently!
Don't throw away right now the tiny bits leftover from cutting stripes into squares. They have all the same height and will be very useful later...

Nov 25, 2010

Making a quilt #3: how much fabric?

This is actually a copy-paste of my answer to Jennifer's question 'How much fabric do I need?', with a few extras.

I'll be using fabrics that have a width of 44 in. I have destined one of the prints for the back (beige with white dots). For this I'll need 36 x 60 in, plus a couple of inches more because of basting and quilting. That means a yard would not be enough but I'll be using the scraps and leftovers from the cutting of the squares to make decorative stripes so it'll do. 
I am assuming I can cut 9 squares from each strip of 4.5 x 44 in (the width of the fabric), which is quite possible. I buy fabric by the yard or meter, but I'll give you quantities for Fat Quarters (FQ = 18 x 22 in) also.

I'll be alternating squares: one 'white with blue dots' and one 'other print' and so on, so I'll need half of my total squares (135) to be 'white with blue dots' (67 squares). If my fabric is 44 in width, I'll need a lenght of 36 in (a full yard).

The other five prints:

Print 1 (20 squares) = 13.5 in (2 FQ)
Print 2 (20 squares) = 13.5 in (2 FQ)
Print 3 (12 squares) = 9 in (1 FQ)
Print 4 (8 squares) = 4.5 in (1/2 FQ)
Print 5 (8 squares) = 4.5 in (1/2 FQ)

As you see, I've already changed my mind and eliminated one of the prints, so we'll need only seven. The reason for this was because I didn't have enough quantity of one of them...
Just beware of one thing: sometimes fabric is cut by the seller in a careless manner and you waste a lot when straightening the edges. Anyway, these quantities are safe and in case something goes wrong you can replace one print by another.

Nov 24, 2010

Windmill Lap Quilts #1 and #2


These quilts are actually the result of a mistake. I intended to make two crib size quilts but I got somehow distracted or bored or whatever and cut the pieces an inch larger that I needed. Do your math, do your math! Instead of putting them aside for a future project, I adapted the proportions to small lap quilts. I am not extremely happy with the result because a 4 x 4 composition does not allow for a central block. Maybe I just have a prejudice against even numbers. But they are crisp and confortable, and the prints are cute... 

My first Craft Fair

Just a quick post to tell you how happy I am to participate in the Mostra de Artesanato Contemporâneo do Dolce Vita, my first craft fair! For the next two weeks, I'll be quilting like mad, sewing bags, creating price tags, finding a 80 cm x 120 cm table and a nice cover to go with it, and making two blue aprons with black swallows for me and my helper. I also still have to find the helper.
This is a great opportunity to meet fellow artisans and show my work to a rather broad public. If you're in Porto in the 4, 5, 18 or 19 December, please come and visit me and the other twenty creative and crafty souls!

Nov 22, 2010

Making a quilt #2: a simple pattern

So now Liz and I have chosen our fabric and the motivation to go with it. Jennifer will surely follow in Italy! I dared myself to use eight different dots and circles prints in a baby quilt for a good friend. I tend to think of quilts as modular systems that start with very simple shapes such as squares. Squares are my favorite shapes at the moment: they are incredibly versatile, very easy to cut and sew in rows and columns and complexity is constructed using just scale and color. I also tend to like my quilts to have an odd number of rows and columns. The reason for this is that you have a central square block that aids to organize the whole surface. A matrix of 3 x 5 blocks has fine proportions for a baby quilt so I’ll make 15 blocks. Each block will be made from 9 little squares and I’ll use only two different prints in each block. Do your math at this point keeping in mind your seam allowances (normally ¼ inch). Keep adding and multiplying until you reach a good compromise between the width and length of your finished quilt. Little squares measuring 4.5 in x 4.5 in (including seam allowance) are fine for me but think about it before you start cutting into your precious fabric!
One thing I must tell you is that I'm not a great planner. I usually start by cutting enough pieces to build about ¾ of the total blocks I need. I try to make a fine composition with those blocks and then I cut and sew the blocks I specifically need to achieve a good overall balance. This is all very intuitive and relaxed! I would save time if I could plan the whole thing ahead but I am quite prone to changing my mind so I’d rather be on the safe side...and keep my fabric safe for as long as possible!

Nov 21, 2010

Eduardo's quilt


My friend Catarina wanted a baby quilt for a friend who's expecting and the baby's name on the bag. My embroidering skills are quite limited (some practice is badly needed) but the result is sweet. Bags are very easy to make, they take just another half an hour to put together and your gift is complete with no need for paper and tape!

Nov 20, 2010

Making a quilt #1: choosing fabric

This week will be dedicated to showing how a quilt is made. Since I took The Process Pledge, I have not yet had the ocasion of sharing the steps that lead to finished quilt. Starting today, I will post brief explanations and my personal options on the making of a quilt.
For me, it all starts with fabric. I pick up a few prints that (for some misterious reason) seem appealing at that particular moment and I try to imagine how to use them. Naturally, I buy a lot of fabric, particularly from USA suppliers. I am a great fan of American 100% cotton prints. Quilting seems to be a national hobby there!
These gorgeous fabrics have just arrived and I am very excited to work with these great prints from the most talented textile designers such as Kaffe Fasset, Amy Butler and Tina Givens. I also get nervous about cutting into them, so sometimes it takes a while until I decide on pattern and size. The first thing I do is to machine wash all new fabric in a gentle cycle with mild detergent, dry, iron and fold neatly. This is necessary because all fabric is prone to some level of shrinking. Also, it's better to check color bleeding at this point so you don't get nasty surprises later.
Alternatively you can recycle fabric: those flowery bedsheets that your mother in law gave you back in 1979, your oldfashioned dress, your husband's shirts (whether you ask him or not beforehand is up to you but I know some people don't appreciate their clothes turning up in a quilt without warning!).  
Get some motivation too: the new baby in the family, your best friend is getting married, your sister is moving away to another country. Think how much they would enjoy something handmade by you...
So that's all for today, pick up your favorite prints and we're ready to start!

Nov 12, 2010

Twin Windmill Baby Quilts


Here are the twin Windmill Baby Quilts I just finished. This color combination is a bit different from what I am usually happy to do and I feel a little ackward: are they 'over-coordinated'? Most prints came from the US and include some lovely and high quality Amy Butler designs. 
Winter has been mild here in Porto so far but nevertheless taking decent pictures is becoming more difficult because of the fading light. I usually use the corner of our kitchen with the best northern light but I fear it will not work for a lot longer...

Nov 11, 2010

Shoo Fly blocks


I was also busy making fifty Shoo Fly blocks that will be soon made into two lap size quilts, one with a white background, the other with a grey background. Shoo Fly blocks are easy and fun to make and I wanted to experiment with them for a while. Experimenting with a grey backgroud was also a novelty to me and I think it will work. Here's a little preview...

Nine Patch Baby Quilt Number Three


And this is the third Nine Patch Baby Quilt. I used lots of Marimekko prints for the little squares and my beloved dots for the border. Nothing compares to Marimekko when it comes to colors. They are amazingly deep and vibrant, I wish I had a lot more of these in my fabric stash. This quilt measures 85 cm x 126 cm. I quite like graphic combinations of prints and dots in bold colors. The back was pieced is acqua, green and the great pink and chocolote dots, with a small orange nine patch for fun. Please contact me if you´re interested in this one or any other quilts...

Windmill Baby Quilt Number Four


Here's the new baby quilt from the 'Windmill series', all happy and fresh. The main colors are acqua and orange so it is quite adequate for both a baby boy or a baby girl. It measures 83 cm x 133 cm, good for the average crib. I used lots of Portuguese fabrics in this one, including the blue and red flowery print that will soon be finished. I was told it was made on purpose for traditional folk garments but the company is sadly closed now. I have about one meter left and I already miss it...

Nov 3, 2010

New bags for Blimunda quilts

This is just a quick post to show you the new bags I am offering with the lap size quilts. They are particularly practical if you like to use your quilts as play mats for children, picnic mats, or just want to take something from home with you when you travel. And of course, if you just want to store your quilt for a while... I hope you like them as much as you enjoy your quilt!

The Marimekko Quilt


After more than a week without my dear old Pfaff, I'm back in business! This is the Marimekko Quilt I showed in a previous post, now totally quilted and binded. I cut simple squares from those beautiful prints and sew them together in a relaxed way, just trying to distribute the dominant colors evenly. For the back I used a plain strong pink and just added two stripes of pieced leftovers from the top. I usually do this because I like to close the process of making a quilt and I don't like to accumulate odd pieces of fabric. And nothing goes to waste or sits there waiting for that improbable day in the future when I decide to turn all those scraps into something useful. So here it is in its 143 cm x 143 cm glory, all washed, fresh and ready to go! Please email me if you're interested...

Oct 19, 2010

Nine Star Quilt Number Two


My second nine stars quilt is now completed, after a nice machine wash to enhance its crinkled goodness. It is perfect for a baby or toddler room: it can be used as a playmat or bed throw. It measures a generous 58 in x 58 in (147 cm x 147 cm). I quilted it more heavily than usual and I am quite happy with the result of brightly colored stars on a pure-white setting, all cotton and fresh. I am afraid my camera does not reproduce exactly the color combination, it is actually nicer than it looks. It is now in the shop, ready to go...

Oct 18, 2010

Self-commissioned baby quilt


This uncomplicated baby quilt was finally handed out on Friday. I had finished it a month ago. It is made of shirt fabric in boyish colors: I just sewed stripes of striped fabric quite spontaneously. The backing is as simple as the top, only the patches are bigger. I wrote the baby’s name on a piece of calico with a pencil and machine embroidered it immediately for the bag: no corrections, no second thoughts. I hope it will be useful in outings and at home as a playmat  because it is bigger than the average crib quilt.
Shirt fabric is soft and totally washable even at high temperatures. I plan on testing it a lot more in future quilts. The final result is so simple and homely it almost makes you smile...

Oct 14, 2010

Simple squares

I was lucky to get a lot of assorted Marimekko fabrics from a good and encouraging friend and finally decided to cut them seriously into a new project. The prints are so bold and the colors so bright that I thought simple squares would do the job. So I've been crawling over a sandwich of top, batting and backing, pin-basting my new quilt. I never seem to have enough pins!

And these are the remains of my day... Bon appetit!

Oct 13, 2010

Almost done...

 Nine colored stars on a pure white setting...
...and the remains of the day.

Nine Patch Baby Quilt Number Two


Here's a special commission for a very special baby. I used the traditional nine patch design and bold Marimekko prints. It turned out quite modern and graphic but still fresh and adequate for a baby. And my beloved dots added the final touch… The Blimunda softie is my offer on personal orders. Don’t hesitate to email me if you wish a particular design or color combination, I love special commissions!

Oct 8, 2010

New baby quilts in the shop


This pyramid of baby quilts and a few more are now in the shop. I just finished these nice calico bags to carry and store the quilts and I am offering one bag as a free gift for each baby quilt purchased.